


Knee pain can hinder mobility and affect your quality of life. Strengthening the muscles surrounding the knee joint is crucial for alleviating pain, improving stability, and preventing further injury. Here are the 10 best knee strengthening exercises, complete with step-by-step instructions, targeted muscles, benefits, and precautions.
Straight Leg Raises
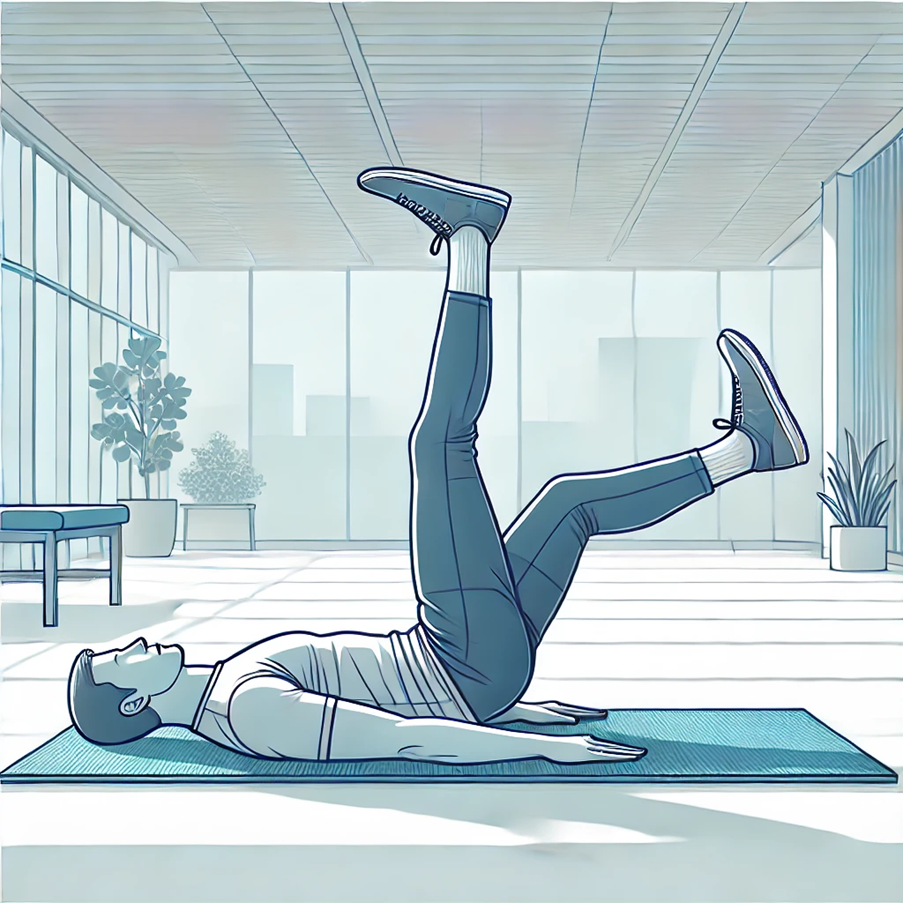
How to Perform
Starting Position
- Lie flat on your back on a comfortable surface, such as a yoga mat or carpet.
- Keep one leg bent at the knee with the foot flat on the floor for support.
- The other leg should remain straight, fully extended.
Engaging the Quadriceps
Tighten the quadriceps (front thigh muscle) of the straight leg. Imagine pulling your kneecap upward while keeping the leg straight.
Lifting the Leg
- Slowly lift the straight leg to a height of 6-8 inches from the ground. Ensure the movement is controlled and smooth.
- Avoid bending the knee or arching your lower back as you lift.
Hold and Lower
- Hold the lifted position for 5 seconds while keeping the muscle engaged.
- Slowly lower the leg back to the floor in a controlled manner, avoiding any jerky motion.
Repetitions
- Perform 10-15 repetitions per leg, ensuring proper form throughout.
- You can repeat the set 2-3 times depending on your fitness level and tolerance.
Muscles Targeted
Primary Muscle
Quadriceps (rectus femoris, vastus medialis, vastus lateralis, and vastus intermedius).
Secondary Support Muscles
- Hip flexors (iliopsoas).
- Core stabilizers (abdominal muscles) help maintain spinal alignment.
Who Can Benefit?
Individuals with Knee Pain
Those with mild to moderate knee pain, such as from overuse or early osteoarthritis, can strengthen the quadriceps to reduce stress on the knee joint.
Post-Surgery Recovery
Commonly recommended for rehabilitation after knee surgeries like anterior cruciate ligament (ACL) repair or meniscus surgery to rebuild strength gradually.
Older Adults
Helps improve knee stability, reducing the risk of falls and supporting better mobility.
Athletes in Recovery
Useful during the early stages of rehabilitation for athletes recovering from knee injuries.
Who Should Avoid Straight Leg Raises?
Severe Knee Instability
If the knee joint feels unstable or wobbly, this exercise might exacerbate discomfort or lead to improper form.
Recent Surgery
Avoid without explicit clearance from a healthcare provider or physical therapist, as premature exercise may impede healing.
Lower Back Pain
Those with a history of lower back pain should perform this exercise cautiously to avoid straining the lumbar spine. If back pain occurs, reduce the range of motion or discontinue.
- Focus on Quality Over Quantity: Prioritize form and muscle engagement over the number of repetitions.
- Avoid Arching the Back: Place a small rolled towel or cushion under your lower back if needed for support.
- Add Ankle Weights for Progression: As strength improves, add light ankle weights (1-2 pounds) to increase resistance.
- Warm Up First: Perform a 5-minute warm-up, like gentle walking or dynamic stretching,to prepare the muscles.
Wall Sits
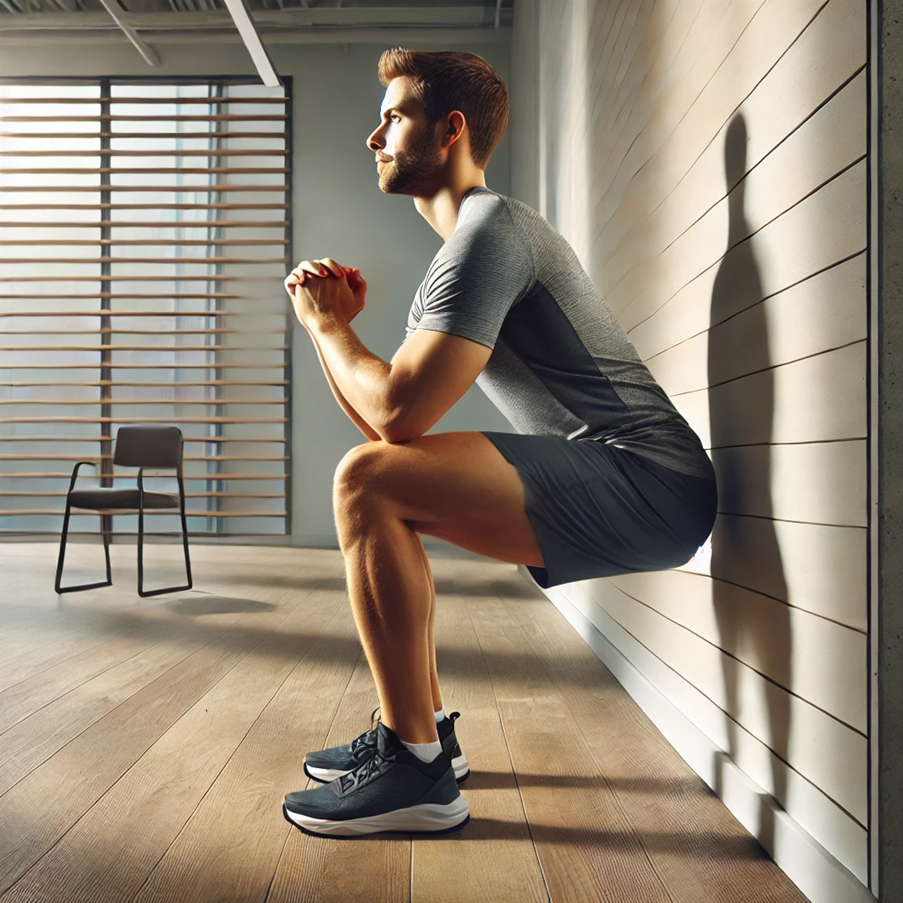
Starting Position
- Stand upright with your back flat against a sturdy wall.
- Position your feet shoulder-width apart and approximately 1-2 feet away from the wall to ensure proper alignment during the exercise.
Sliding Down
- Slowly slide your back down the wall, bending your knees as you descend.
- Stop when your knees are at a 90-degree angle, forming a straight line from your knees to your toes. Your thighs should be parallel to the floor.
- Keep your knees aligned over your ankles, avoiding inward or outward collapse.
Holding the Position
- Engage your core muscles and keep your back pressed against the wall.
- Maintain the position for 10-30 seconds, or longer as you build strength.
- Breathe evenly, avoiding holding your breath.
Returning to Starting Position
- Slowly slide back up the wall to a standing position.
- Rest for a few seconds and repeat the exercise.
Repetitions
Aim for 3-5 repetitions initially, gradually increasing as your strength improves.
Muscles Targeted
- Quadriceps: Located at the front of the thigh, these muscles are primarily responsible for extending the knee and stabilizing the joint.
- Hamstrings: Situated at the back of the thigh, they support the quadriceps by controlling knee flexion and contributing to joint stability.
- Glutes: The gluteal muscles assist in hip stabilization and overall lower-body strength, reducing strain on the knees.
Who Can Benefit
- Individuals with Knee Instability: Wall sits help strengthen the muscles supporting the knee joint, improving stability during movement.
- Athletes: This is an excellent exercise for building lower-body endurance and preventing sports-related injuries.
- Those with Early-Stage Osteoarthritis Wall sits strengthen the surrounding muscles, reducing load on the knee joint and alleviating pain.
- Rehabilitation Patients: Useful for post-surgery recovery to rebuild muscle strength under guided supervision.
Who Should Avoid Wall Sits
- Severe Knee Arthritis: The sustained pressure on the knee joint during a wall sit may aggravate pain and inflammation in advanced arthritis.
- Patellofemoral Pain Syndrome: This condition, characterized by pain around the kneecap, can worsen with wall sits due to increased stress on the patella.
- Acute Knee Injuries: Avoid wall sits if you’re recovering from a recent ligament tear, meniscal injury, or any condition causing instability or acute pain.
- Back Pain or Weak Core: Individuals with a weak core or lower back issues may struggle to maintain proper posture, potentially worsening their condition.
Tips for Safe Execution
- Modify as Needed: If 90 degrees is too challenging, try a smaller knee bend (e.g., 45 degrees) to reduce joint strain.
- Use a Timer: Gradually increase your hold time as endurance builds, starting with shorter durations.
- Focus on Alignment: Ensure your knees do not extend past your toes, as this increases joint strain.
- Engage Core Muscles: Activating your core helps maintain a neutral spine and reduces the risk of back strain.
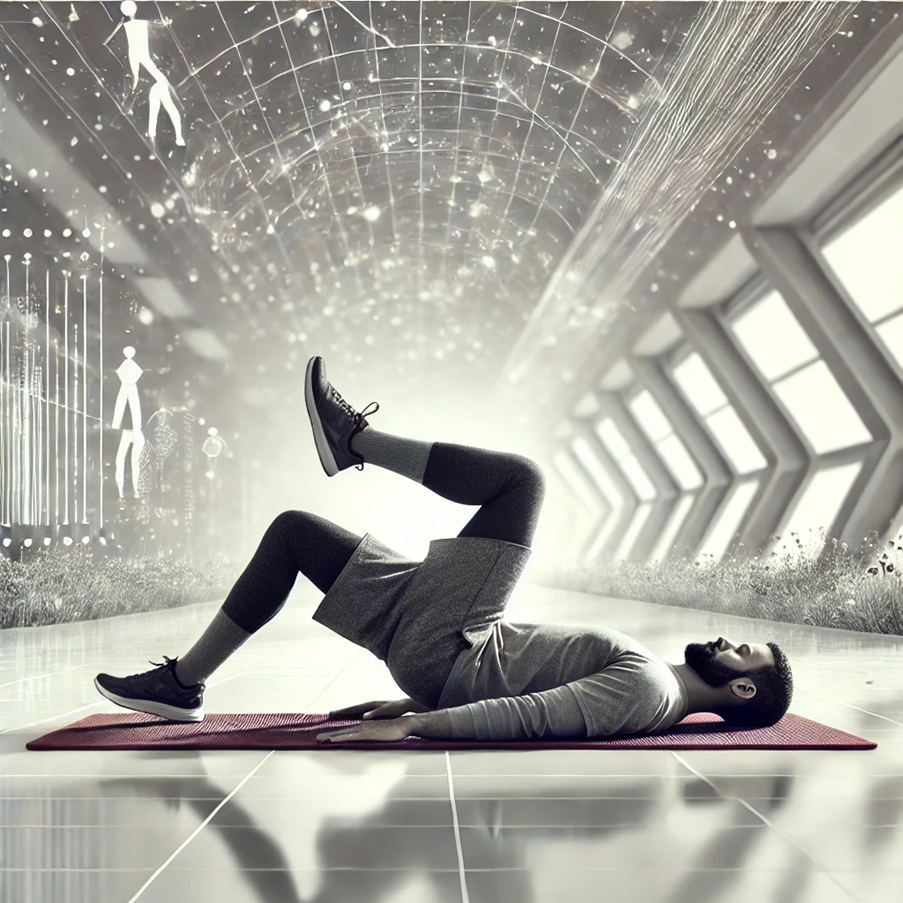
Glute Bridges
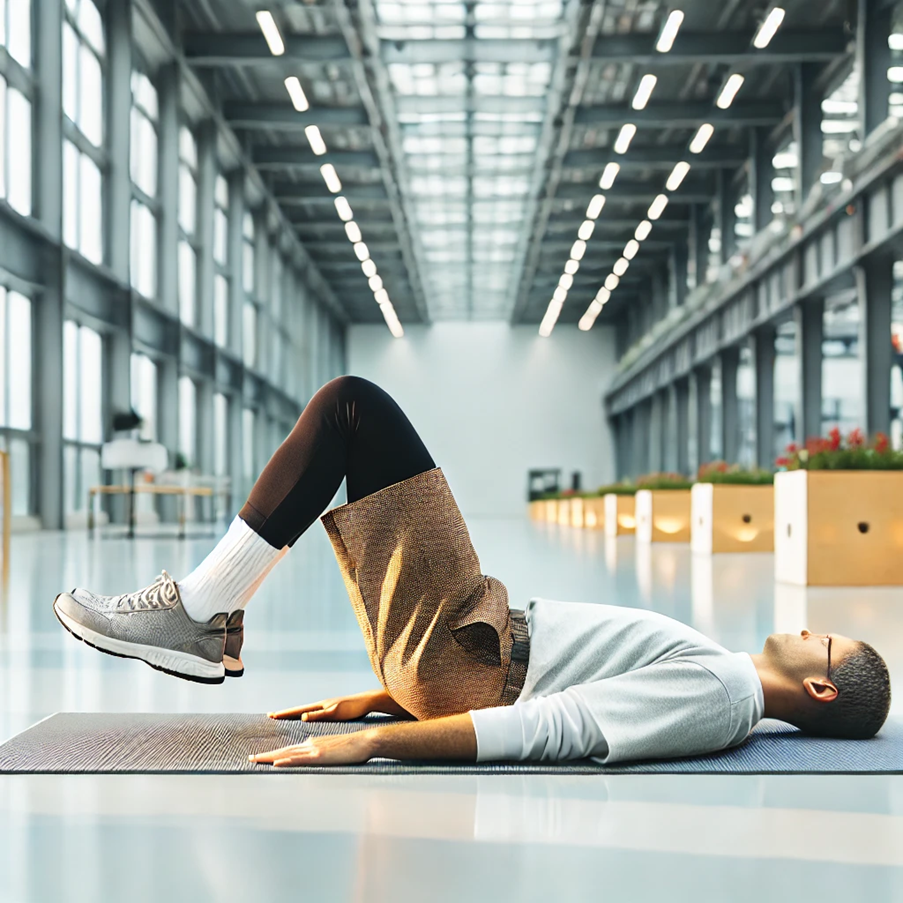
How to Perform
Setup
- Lie on your back on a flat, stable surface like a mat or carpet.
- Bend your knees so your feet are flat on the floor, hip-width apart.
- Keep your arms at your sides with palms facing down for stability.
Engage Core and Glutes
Tighten your abdominal muscles and squeeze your glutes to activate these muscles before movement.
Lift Hips
- Push through your heels and lift your hips toward the ceiling.
- Aim to form a straight line from your shoulders to your knees at the top of the movement.
- Avoid overarching your lower back; the lift should come from your glutes, not your spine.
Hold
Hold the bridge position for 2-3 seconds, maintaining a firm squeeze in your glutes.
Lower Back Down
- Slowly lower your hips back to the floor while maintaining control.
- Avoid dropping abruptly to keep tension in the glutes and hamstrings.
Repetition
Perform 10-15 repetitions. You can add more sets or hold the top position longer as you progress.
Muscles Targeted
- Gluteus Maximus: The primary muscle worked during the lift, contributing to hip extension.
- Hamstrings: Assist in stabilizing the knee and extending the hip.
- Core Muscles: Engage to maintain pelvic and lumbar stability.
- Erector Spinae: Provide support to the spine during the lift.
Who Can Benefit
- Runners and Athletes: Improves hip stability and strengthens the posterior chain, reducing the risk of knee injuries.
- Individuals with Knee Pain: Strengthens the glutes and hamstrings, taking pressure off the knee joint.
- Posture Improvement: Counteracts the effects of prolonged sitting, which can weaken the glutes.
- Post-Surgery Rehabilitation: A low-impact exercise suitable for early stages of recovery (if cleared by a healthcare provider).
Who Should Avoid
- Acute Lower Back Pain: The lifting motion may exacerbate discomfort or strain the lumbar region.
- Severe Hip Issues: Individuals with hip labral tears or severe arthritis may experience increased discomfort.
- Recent Surgery: Avoid unless cleared by a healthcare professional, especially after spinal or hip procedures.
Tips for Safe and Effective Glute Bridges
Alignment
Ensure knees are aligned over ankles during the lift to prevent unnecessary strain.
Breathing
Exhale during the lift and inhale while lowering to maintain control.
Progression
- Add resistance by placing a weight or barbell across your hips.
- Try single-leg glute bridges for increased difficulty.
Common Mistakes to Avoid
- Overarching the Back: Focus on lifting with your glutes, not your lower back.
- Feet Too Close or Far from the Body: Position your feet so your knees form a 90-degree angle at the top of the lift.
- Neglecting Core Engagement: Failing to activate the core can lead to poor form and reduced effectiveness.
Step-Ups
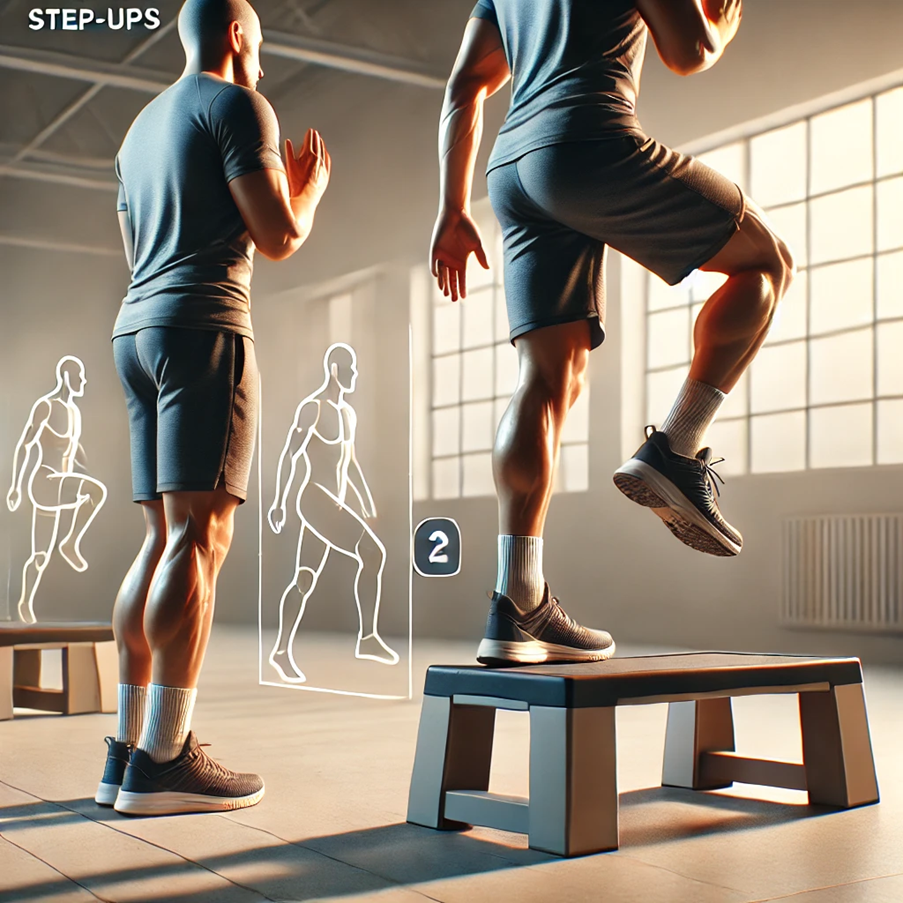
Step-ups are a functional and highly effective exercise to strengthen the muscles around the knee and hip joints. This simple movement mimics daily activities like climbing stairs and is versatile for various fitness levels.
How to Perform Step-Ups (Detailed Steps)
Preparation
- Choose a sturdy step, bench, or platform. The height should ideally allow your knee to bend at a 90-degree angle when your foot is on it. Start with a lower platform if you’re a beginner.
- Stand upright with feet hip-width apart and engage your core for stability.
Execution
- Step 1: Place your right foot firmly on the step or platform. Ensure your entire foot is flat, and avoid keeping just the toes or heels on the edge.
- Step 2: Push through your right heel as you straighten your right leg and lift your body onto the platform. The left foot should only assist minimally for balance, not for propulsion.
- Step 3: Bring your left foot up to stand fully on the platform with both feet.
- Step 4: Step down with your left foot first, followed by the right, in a controlled manner. Avoid dropping down quickly to reduce joint impact.
Repetitions
Perform 10-12 repetitions on one leg before switching to the other. For increased difficulty, hold dumbbells or a kettlebell.
Muscles Targeted
- Quadriceps: Primary movers during the lifting phase.
- Hamstrings: Assist in stabilizing the knee and hip joint.
- Glutes (Gluteus Maximus): Engage when pushing through the heel and lifting your body upward.
- Calves and Core Stabilizers: Provide balance and additional support.
Who Can Benefit
- Athletes: Improves lower body strength and power for sports involving running, jumping, or sudden directional changes.
- Individuals Recovering from Mild Knee Injuries: Strengthens stabilizing muscles around the joint, reducing strain on the knee itself.
- Older Adults: Enhances balance, mobility, and the ability to navigate stairs confidently.
- Fitness Enthusiasts: Builds strength and endurance in a functional, low-impact manner.
Who Should Avoid
- Severe Joint Instability: Individuals with ligament tears (e.g., ACL or PCL) or meniscus injuries should avoid this exercise unless cleared by a healthcare provider.
- Balance Issues: If you are prone to dizziness or have poor balance, step-ups can increase the risk of falls. Consider holding onto a sturdy surface or rail.
- Severe Arthritis or Chronic Pain: The increased pressure on the knee joint can aggravate symptoms. Modifications like a lower step or alternative exercises may be better.
- Acute Injuries: Avoid if recovering from a recent knee or ankle injury without medical guidance.
Tips for Maximum Benefit
- Form First: Ensure proper form to target the right muscles and prevent injury. Avoid leaning forward or using momentum.
- Controlled Movements: Focus on a slow and steady pace to engage muscles fully and minimize joint stress.
- Breathing: Exhale as you push through your heel to lift your body and inhale as you lower down.
- Progress Gradually: Increase step height or add resistance only when you can perform the movement with perfect form.
Step-ups are a cornerstone exercise for knee health, promoting strength, stability, and endurance. For personalized guidance and modifications, consult a physical therapist or the team at Alleviate Pain Clinic.
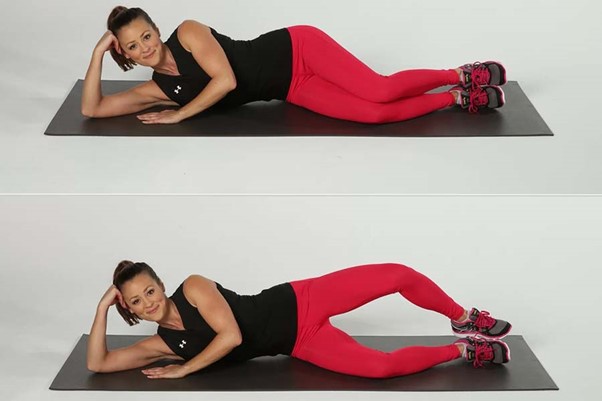
Clamshells
Clamshells are a simple yet powerful exercise for strengthening the muscles that support the hips and knees. They are often prescribed as part of rehabilitation programs for knee pain and hip stability.
How to Perform Clamshells: Step-by-Step
Set Up
- Lie on your side on a firm, comfortable surface (e.g., yoga mat).
- Bend your knees to a 90-degree angle and stack them on top of each other.
- Your hips and shoulders should form a straight line.
Positioning
- Keep your feet together and in line with your hips.
- Engage your core muscles to stabilize your trunk and prevent rolling backward.
The Movement
- Slowly lift the top knee while keeping your feet together, mimicking the opening of a clamshell.
- Pause at the top of the movement for 1-2 seconds to feel the muscle activation.
- Lower your knee back to the starting position with control.
Repetition
- Perform 10-15 repetitions per side.
- For added intensity, place a resistance band just above your knees.
Muscles Targeted
- Primary: Gluteus medius and minimus (hip abductors).
- Secondary: Obliques (for trunk stability), tensor fascia lata (TFL), and pelvic stabilizers.
Who Can Benefit from Clamshells?
Clamshells are particularly beneficial for individuals who need to improve hip and knee stability.
- Knee Pain Sufferers: Weak hip abductors often contribute to misalignment and excessive stress on the knee joint. Clamshells strengthen these muscles, reducing knee strain.
- Runners and Cyclists: These athletes can benefit from enhanced hip stability, which minimizes knee valgus (inward knee collapse) and prevents overuse injuries.
- Post-Injury Rehabilitation: Clamshells are often included in recovery programs for knee injuries, such as ACL tears, and hip injuries to restore strength and stability.
- Individuals with Flat Feet or Pronation: Weak hips can exacerbate problems caused by flat feet, leading to knee pain. Strengthening the hips helps distribute forces more evenly.
Who Should Avoid Clamshells?
- Hip Impingement Syndrome: This condition may cause discomfort or pain during hip abduction exercises like clamshells.
- Acute Hip Pain or Bursitis: Individuals with inflammation in the hip joint or surrounding tissues should avoid clamshells until symptoms resolve.
- Severe Lumbar Instability: If you cannot maintain core stability during the exercise, it may lead to compensatory lower back strain.
Tips for Maximum Effectiveness
- Use Proper Form: Avoid rolling your hips backward during the movement. Your pelvis should stay stable.
- Start Without Resistance: Begin with body weight and progress to resistance bands as your strength improves.
- Control the Movement: Slow, controlled movements are key to properly engaging the gluteus medius.
- Include in Routine: Pair clamshells with other hip-strengthening exercises like side-lying leg lifts for comprehensive results.
Seated Knee Extensions
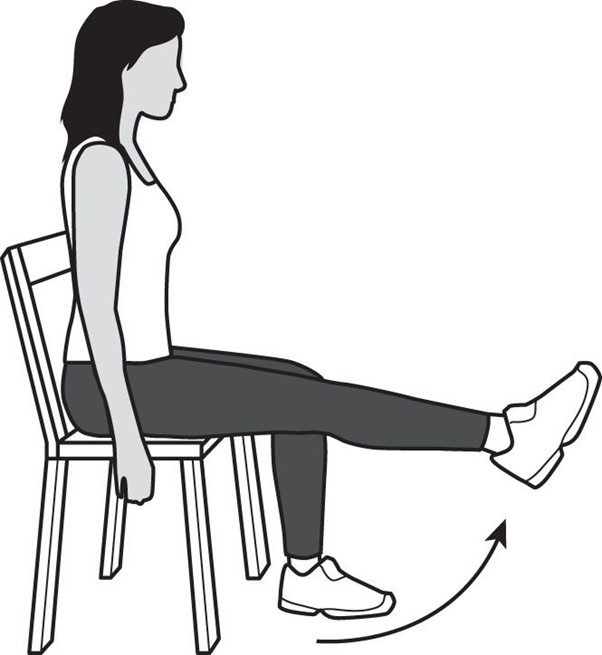
This is a simple yet effective exercise for strengthening the quadriceps, which play a vital role in supporting the knee joint. It’s particularly beneficial for individuals with limited mobility or those looking for a low-impact exercise.
Step-by-Step Guide to Perform
Muscles Targeted
- Primary: Quadriceps (vastus medialis, vastus lateralis, vastus intermedius, and rectus femoris).
- Secondary: Patellar stabilizers, which support the knee cap and enhance joint stability.
Who Can Benefit
Elderly Individuals
- Improves quadriceps strength and reduces the risk of falls.
- Enhances mobility and the ability to perform daily tasks like standing from a seated position or climbing stairs.
Post-Surgery Recovery
A low-impact option for individuals recovering from knee surgeries, such as total knee replacement or ACL repair, under professional guidance.
People with Mild to Moderate Knee Pain
Helps alleviate discomfort caused by weak quadriceps and provides additional joint support.
Athletes
Acts as a warm-up or rehabilitation exercise to improve knee joint stability and performance.
Who Should Avoid
- Recent Knee Surgery Patients: Avoid without medical clearance, as excessive strain on the knee joint can impede recovery.
- Severe Joint Pain or Swelling: If the exercise causes discomfort, it’s advisable to stop and consult a healthcare provider.
Additional Tips
- Breathing: Inhale as you lift the leg and exhale as you lower it.
- Form: Avoid locking the knee at the top of the movement to prevent unnecessary strain.
- Speed: Perform the movement slowly and in a controlled manner to engage the muscles effectively.
Calf Raises
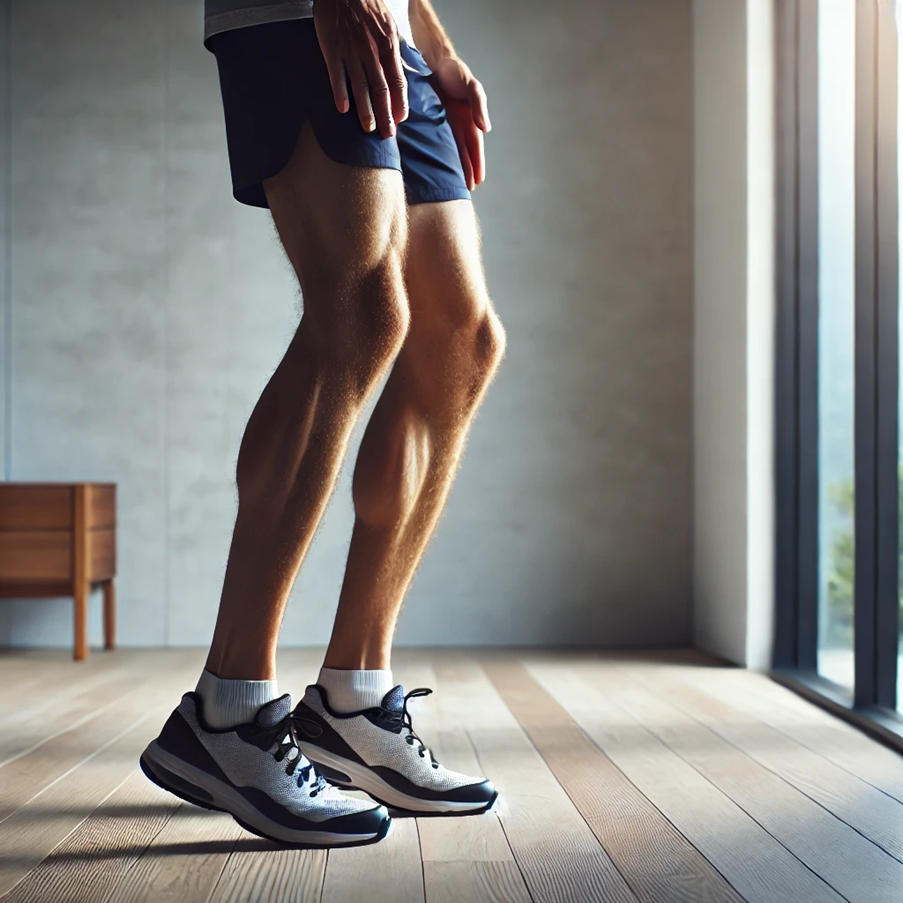
Calf raises are a simple yet effective exercise to strengthen the lower leg muscles, enhance knee stability, and improve overall balance. Here’s a detailed guide to performing calf raises correctly and safely.
Step-by-Step Instructions
Starting Position
- Stand upright with your feet hip-width apart.
- Distribute your weight evenly between both feet.
- Place your hands on your hips, or lightly rest them on a wall or sturdy surface for balance.
Movement
- Engage your core for stability.
- Slowly rise onto the balls of your feet by lifting your heels off the ground. Focus on moving in a controlled manner rather than bouncing.
- Hold this raised position for 2-3 seconds, squeezing your calf muscles at the top.
Lowering
- Slowly lower your heels back to the ground, maintaining control throughout the descent.
- Avoid letting your heels touch the floor abruptly; instead, let them gently rest before starting the next repetition.
Repetitions
- Perform 15-20 repetitions per set. Gradually increase to 3 sets as your strength improves.
- If you want to challenge yourself, try single-leg calf raises or add light weights for resistance.
Muscles Targeted
- Gastrocnemius (Upper Calf): Provides power for movements like walking, running, and jumping.
- Soleus (Lower Calf): Plays a crucial role in maintaining balance and posture during prolonged standing.
- Stabilizers Around the Knee: Helps to stabilize the knee joint, especially during weight-bearing activities.
Who Can Benefit
- People with Knee Pain: Strengthens the lower leg muscles, which helps reduce the load on the knees.
- Athletes: Improves performance in running, jumping, and agility-focused sports by enhancing ankle strength and coordination.
- Older Adults: Boosts balance and prevents falls by improving lower body stability.
- Rehabilitation Patients:Useful for recovery from knee surgeries or injuries (under guidance).
- Runners and Cyclists: Prevents overuse injuries by strengthening the calves and reducing stress on the Achilles tendon and knee.
Who Should Avoid
- Achilles Tendon Issues: Individuals with Achilles tendinitis or a history of tendon tears should avoid or modify calf raises as they can aggravate the condition.
- Severe Balance Problems: If you have significant balance issues, perform the exercise with support or under supervision to avoid falls.
- Acute Ankle or Foot Pain: Avoid calf raises if you have active pain, inflammation, or fractures in the foot or ankle area.
Tips for Better Results
Maintain Proper Form
Avoid leaning forward or backward. Keep your spine neutral and focus on engaging the calves.
Add Variations
- Single-Leg Calf Raises: Perform the movement on one foot to increase intensity and activate stabilizing muscles.
- Weighted Calf Raises: Hold dumbbells for added resistance.
Progress Gradually
Start with fewer repetitions and increase as your strength improves.
Stretch Post-Exercise
Perform calf stretches to maintain flexibility and prevent stiffness after the exercise.
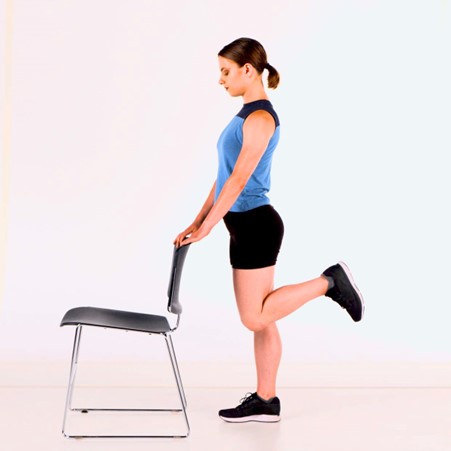
Hamstring Curls
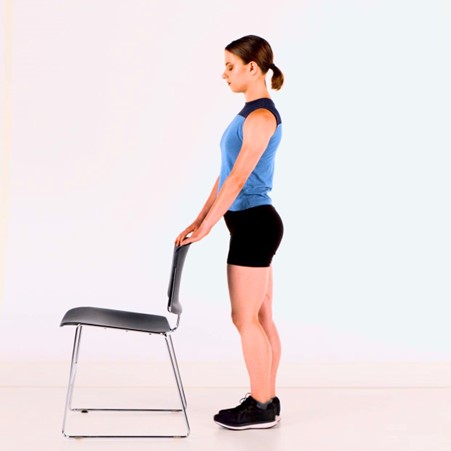
Standing hamstring curl
How to Perform
Preparation
- Stand upright with your feet shoulder-width apart.
- Use a sturdy chair, countertop, or wall for balance and support.
Execution
- Shift your weight slightly to one leg while keeping your posture upright.
- Bend the opposite knee, bringing your heel toward your buttocks as far as you comfortably can.
- Hold the top position for 1-2 seconds, focusing on engaging the hamstrings.
Lowering Phase
Slowly lower your foot back to the starting position with control to avoid sudden drops.
Repetition
- Perform 10-15 repetitions per leg.
- Complete 2-3 sets for each leg, with a 30-second rest between sets.
Progression
Add ankle weights for added resistance once you’ve mastered the bodyweight version.
Muscles Targeted
- Primary: Hamstrings (biceps femoris, semitendinosus, semimembranosus).
- Secondary: Calves (gastrocnemius) and glutes assist in stabilizing during the movement.
Who Can Benefit
- Athletes: Runners, cyclists, and sprinters can enhance posterior chain strength for improved performance and reduced injury risk.
- Rehabilitation Patients: Individuals recovering from knee surgery (e.g., ACL reconstruction) can use this exercise to rebuild hamstring strength with medical clearance.
- Office Workers: Those with sedentary lifestyles can counteract muscle imbalances caused by prolonged sitting.
- Older Adults: Provides a low-impact way to maintain muscle tone and joint stability in the knees.
Who Should Avoid
- Hamstring Strains or Tears: Avoid until fully healed, as this movement can aggravate the injury.
- Severe Knee Pain or Instability: Consult with a healthcare professional before attempting, as underlying joint issues may need targeted intervention.
- Tendinitis or Inflammation: Individuals with inflamed tendons in the knee or hamstring region should allow recovery time before engaging in this exercise.
Tips for Optimal Performance
- Posture: Keep your torso upright and avoid leaning forward or backward.
- Core Engagement: Activate your core muscles to maintain stability and prevent sway.
- Range of Motion: Only bend the knee as far as your flexibility and strength allow without discomfort.
- Consistency: Perform regularly to see gradual improvements in hamstring strength and knee stability.
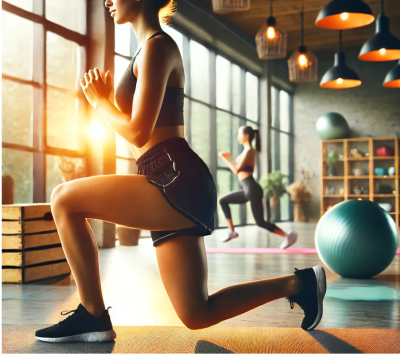
Lunges
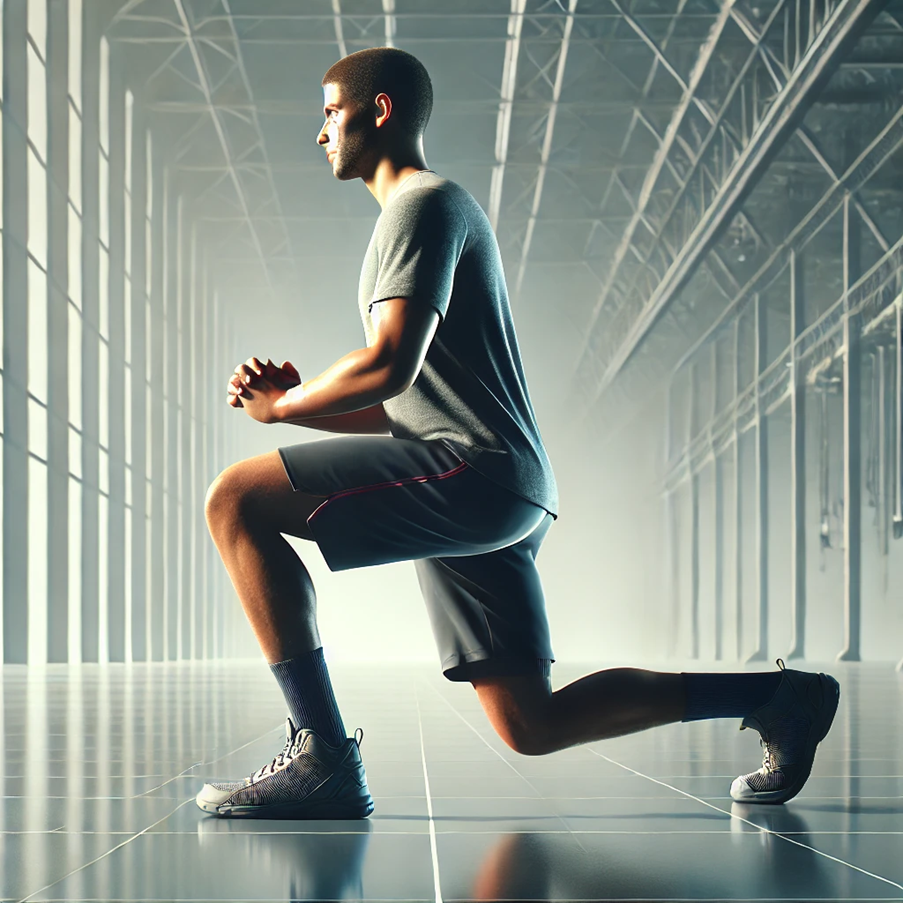
Lunges are a versatile and effective exercise for strengthening the lower body and improving overall stability. Here’s an in-depth look into how to perform lunges correctly, their benefits, and considerations.
How to Perform Lunges (Step-by-Step Guide)
Starting Position
- Stand tall with your feet hip-width apart.
- Keep your chest upright, shoulders relaxed, and core engaged.
Step Forward
- Take a controlled step forward with your right foot, ensuring your stride is neither too short nor too long.
- Keep your weight evenly distributed between your front and back legs.
Lower Your Body
- Bend both knees simultaneously until your front thigh is parallel to the ground, and your back knee hovers just above the floor.
- Your front knee should align directly above your ankle (not extending past your toes).
Hold the Position
Pause briefly in this position to maintain balance and engage your muscles.
Push Back Up
Drive through the heel of your front foot to return to the starting position.
Alternate Legs
- Repeat the movement with your left leg.
- Perform 8-12 repetitions per leg, completing 2-3 sets as tolerated.
Tips for Proper Form
- Keep your chest upright and avoid leaning forward.
- Engage your core to maintain balance throughout the movement.
- Avoid locking your knees at the top of the movement.
- Ensure controlled and steady motion; avoid sudden jerks.
Muscles Targeted
- Quadriceps: Activated during the lowering and rising phases to control knee extension.
- Hamstrings: Assist in stabilizing the knee and supporting hip movements.
- Glutes: Engaged to propel your body back to the starting position.
- Calves and Core: Secondary stabilizers to maintain balance.
Who Can Benefit
- Athletes: Enhances lower-body strength and dynamic stability, crucial for running, jumping, and agility sports.
- Fitness Enthusiasts: Ideal for toning legs and improving balance in regular workout routines.
- Individuals with Mild Knee Pain or Weakness: Gradual and controlled lunges can help strengthen supporting muscles.
- Older Adults: Improves functional strength for activities like climbing stairs or getting up from a seated position.
Who Should Avoid
- Severe Knee Arthritis: The bending motion may exacerbate pain and strain on the joint.
- Knee Instability: Lunges require balance; weak or unstable knees may increase the risk of injury.
- Acute Knee or Hip Injuries: Avoid lunges during the recovery phase to prevent aggravating the injury.
- Poor Balance or Coordination: Consider supported lunges (holding onto a sturdy surface) or alternative exercises.
Modifications for Safety
- Assisted Lunges: Hold onto a chair or wall for support.
- Reduced Range of Motion: Lower your body only halfway instead of forming a full 90-degree angle.
- Static Lunges: Perform the exercise in place without alternating steps.
Side-Lying Leg Lifts
How to Perform Side-Lying Leg Lifts
Starting Position
- Lie on your side on a flat, firm surface, such as a yoga mat.
- Keep your legs extended and stacked one on top of the other.
- Rest your head on your lower arm or support it with your hand for comfort.
- Keep your body straight from head to toe, avoiding arching or bending at the waist.
Engage Your Core
- Tighten your abdominal muscles slightly to stabilize your torso.
- Maintain a neutral spine throughout the movement.
Lifting the Top Leg
- Slowly lift your top leg upward to a 45-degree angle. Focus on controlled motion rather than speed.
- Keep your foot flexed (toes pointing forward) or slightly pointed, depending on your comfort and focus on muscle activation.
- Avoid letting your hips roll backward or forward; they should remain aligned.
Repetitions
- Perform 10-15 repetitions per leg.
- Switch sides and repeat for the opposite leg.
Muscles Targeted
Primary Muscles
- Gluteus medius (the primary stabilizer for lateral movements).
- Hip abductors (muscles that move the leg away from the body’s midline).
Secondary Muscles
- Gluteus minimus.
- Tensor fasciae latae (TFL), which aids in stabilizing the hip and knee.
Who Can Benefit
Runners and Walkers
- Strengthens the hip abductors, preventing overuse injuries like iliotibial (IT) band syndrome.
- Enhances pelvic stability, improving gait mechanics.
Individuals with Knee Pain
Provides indirect support to the knee by stabilizing the hip joint, reducing strain on the knee.
People with Weak Hip Muscles
Especially beneficial for those recovering from hip surgery, muscle imbalances, or prolonged inactivity.
Athletes
Improves lateral stability, essential for sports involving quick direction changes.
Seniors
Helps maintain balance and reduce fall risk by strengthening stabilizing muscles around the hip and knee.
Who Should Avoid
- Individuals with Hip Bursitis: The repetitive motion may irritate the inflamed bursa, worsening symptoms.
- People with Lateral Knee Pain: Conditions such as IT band syndrome or lateral meniscus issues may be aggravated by this exercise.
- Those Experiencing Acute Hip Pain: Any sharp or shooting pain during the movement should be addressed by a healthcare provider before continuing.
Tips for Optimal Performance
- Alignment: Keep your hips stacked and avoid rolling backward or forward to target the correct muscles.
- Range of Motion: Lift your leg only as high as you can without compromising form or causing discomfort.
- Breathing: Inhale as you lift your leg, and exhale as you lower it.
- Progression: To make the exercise more challenging, add ankle weights or resistance bands.
Key Benefits of Knee Strengthening Exercises
- Improved joint stability.
- Reduced knee pain and inflammation.
- Enhanced mobility and balance.
- Prevention of injuries.
- Improved performance in daily activities and sports.
General Precautions
- Warm up before starting any exercise.
- Avoid overexertion or pain during exercises.
- Consult a healthcare professional if you have a history of knee injuries or conditions.
- Gradually progress intensity and repetitions as tolerated.
For tailored exercise plans or advanced knee pain management, contact Alleviate Pain Clinic today. Your journey to pain-free living starts here!
